Porting Anita from Angular to React resulted in 20% less code
ArticlePublished on November 10, 2021 by ilDon

I started developing Anita in Angular because I had previously developed with it a form generator that could power the core parts of the app. Having years of experience also with React, though, I soon realized that Angular was slowing me down. So I decided to port Anita from Angular to React.
The whole project took under 10 days, in which I worked on it only in my spare time. I can easily say that it was well worth it as the code base, with the exact same functionalities, is now 20% smaller.
Let's see some stats, generated with VS Code Counter.
The Angular code base was:
| language | files | code | comments |
|---|---|---|---|
| TypeScript | 176 | 5,433 | 1,583 |
| Templates | 38 | 566 | 0 |
| SCSS | 18 | 698 | 110 |
Excluding SCSS, the total lines of code of the Angular app, including the templates, was 5.999. I'm counting the templates as code because Angular adheres to the MVVM (Model, View, View Controller) pattern, which means that the templates are compiled into the JavaScript code. In short, in Angular, a template is a chunk of HTML with a special syntax to support some Angular features, like for loops (see the docs).
The React code base is:
| language | files | code | comments |
|---|---|---|---|
| TypeScript | 111 | 3,149 | 1,448 |
| TypeScript React | 56 | 1,767 | 31 |
| CSS | 1 | 16 | 3 |
So, the total lines of code of the React app, including the templates, is 4.916.
Let's run the math:
Angular total: 5.999
React total: 4.916
Difference: -1.083 (-19.8443%)
This is a huge improvement. This reduction is even more significant if we consider that in the Angular app we were using a UI library called Nebular, while in React the whole UI is custom-built with TailwindCSS. So in React we have a lot more DOM elements (-> lines of code) to render elements that in Angular were a 1 line import.
While your mileage may vary, the above results are significant because both code bases have been entirely written by the same individual developer. So the design choices and the styling are very similar. I believe that this result represents very well the difference between Angular and React. The Angular code base is bigger, and it's more complex, as we will see shortly. The React code base is smaller, and it's also simpler.
Getting started
The quickest and easiest path for porting Anita is to start with a fresh new React app with create-react-app.
Since we want to keep the offline capabilities of the Angular app, and we want to use TypeScript, the command to create the React app is:
npx create-react-app anita-react --template cra-template-pwa-typescript
Let's run yarn start to check that everything works as expected:

The only drawback of create-react-app is that it adds a lot of starter stuff to the project. Let's remove it.
We don't need the App component, and its related files, and we can also clean up index.tsx:
    import React from 'react';
    import ReactDOM from 'react-dom';
    import './index.css';
    import * as serviceWorkerRegistration from './serviceWorkerRegistration';

    ReactDOM.render(
      <React.StrictMode>
        "Hello World"
      </React.StrictMode>,
      document.getElementById('root')
    );

    serviceWorkerRegistration.register();
Deleted files:
- App.csss
- App.test.tsx
- App.tsx
In an Angular project all static files are normally in the app/src/assets folder. In React the assets folder is normally placed in the public folder. Let's move assets there. This fells already like an improvement over Angular. Keeping the assets folder in src is counterintuitive, as it doesn't contain source files, but rather static files ready to be served to the users.
Now we can update index.html and manifest.json in public, add Anita icons, title, and description. We can also remove the starter files left there by create-react-app:
- public/favicon.ico
- public/logo192.jpg
- public/logo512.jpg
Now let's move to the code base.
Absolute imports
In the Angular project of Anita, we use absolute paths to simplify imports, with a custom prefix @anita/client.
For example, we use this statement: import { MyModule } from '@anita/client/my.module', instead of import { AppModule } from '../../../my.module'.
This is achieved by properly configuring the paths in tsconfig.json.
"CompilerOptions": {
    ...
    "paths": {
      "@anita/client/*": [
        "src/app/*"
      ]
    }
    ...
}
The advantage of this import method when developing Angular apps is that we avoid import hell. When the code base starts to grow, with relative imports very long paths to navigate up and down the code base start to show up. For example ../../../../../my.module.ts is a long path to navigate the code base. @anita/client/my.module is certainly shorter and more readable.
In addition, absolute paths to a given file are always identical, no matter were they are in the tree structure of the project, as they are relative to the root of the code base.
In the process of porting all code to React, this import strategy comes in very handy as we can move all code to the new project, and use replace all to update all imports at once.
To do so we must use absolute paths also in the React app.
In React, we cannot use paths in tsconfig.json. We can however use baseUrl, which allows us to import files with absolute paths from the specified base path. In our case we chose the src folder:
"CompilerOptions": {
    ...
    "baseUrl": "src"
    ...
}
With this configuration, we can import files with absolute paths from the root of the code base. So ./src/app/app.component becomes app/app.component.
In this way, when porting the code we can simply replace all occurrences of @anita/client with app, and all imports will work as they are, as long as we keep the same folder hierarchy.
So let's move on to the project structure.
Project structure
To ease the transition from Angular to React, we keep a similar folder hierarchy. This will come in handy when we move all the code that can be simply dropped in the React project as is.
The structure of the Angular app was:
src/app/data: contains the data modelslibs: contains the libraries that are not Angular specificng-services: contains Angular Servicesui: contains the Angular UI elements, plus some Angular Services and Pipes needed for the UI
In React we can have an even simpler structure:
src/app/anita-routes: contains the routes of the app. We can place them here as they are no longer an Angular Service.data: contains the same data models of the Angular applibs: contains the libraries that were already used in the Angular app, and that can be ported to React as they are or with minimal changesui-react-components: contains the React components
Setting up the UI: from Nebular to TailwindCSS
As I mentioned, for building the UI of the Angular version of Anita I used Nebular «a customizable Angular UI library». Nebular has been great for its purpose, but it's only for Angular, and for React would be an overkill.
For a project like Anita I believe that TaliwindCSS is a much better alternative. As advertised on their landing page, TailwindCSS is «a utility-first CSS framework packed with classes like flex, pt-4, text-center and rotate-90 that can be composed to build any design, directly in your markup». If you build UIs, and you've never tried it, you should really give it a try. It's the most versatile UI framework you'll find.
Installing TailwindCSS for React is extremely easy thanks to the well outlined guide in the official docs of Tailwind, you can check them out here.
We already use TailwindCSS for the landing page of Anita, so we can share in the app the same styles as the landing page. Basically all we need to do is to define the project colors in tailwind.config.js:
const colors = require('tailwindcss/colors')

module.exports = {
  // Purges the final stylesheet of unused/un-optimized selectors, keeping only what is used in the app.
  purge: ['./src/**/*.{js,jsx,ts,tsx}', './public/index.html'],
  darkMode: false,
  theme: {
    colors: {
      transparent: 'transparent',
      current: 'currentColor',
      black: colors.black,
      white: colors.white,
      rose: colors.rose,
      pink: colors.pink,
      fuchsia: colors.fuchsia,
      purple: colors.purple,
      violet: colors.violet,
      indigo: colors.indigo,
      blue: colors.blue,
      'prussian-blue': {
        DEFAULT: '#002346',
        '50': '#2D96FF',
        '100': '#1389FF',
        '200': '#006FDF',
        '300': '#0056AC',
        '400': '#003C79',
        '500': '#002346',
        '600': '#002346',
        '700': '#000f20',
        '800': '#000e1f',
        '900': '#000d1b'
      },
      sky: colors.sky,
      cyan: colors.cyan,
      teal: colors.teal,
      emerald: colors.emerald,
      green: colors.green,
      lime: colors.lime,
      yellow: colors.yellow,
      amber: colors.amber,
      orange: colors.orange,
      red: colors.red,
      warmGray: colors.warmGray,
      trueGray: colors.trueGray,
      gray: colors.gray,
      coolGray: colors.coolGray,
      blueGray: colors.blueGray
    }
  },
  variants: {
    extend: {},
  },
  plugins: [
    require('@tailwindcss/forms')
  ],
}
Now lets' create some layouts with TailwindCSS. Because we will have an admin panel as our main view, we can start from there.
Let's implement a very basic admin panel in index.tsx:
ReactDOM.render(
  <React.StrictMode>
    <div className="bg-prussian-blue-400 text-gray-100 flex justify-between">
      <div className="flex-grow relative flex items-center lg:w-auto lg:static pl-5">
        <a className="text-lg font-bold leading-relaxed inline-block mr-4 py-2 whitespace-no-wrap uppercase text-white" href="/">
          <img src="/assets/logo/logo_square.svg" style={{ height: '30px', width: 'auto' }} alt="Anita" />
        </a>
        <a className="text-md font-bold leading-relaxed inline-block mr-4 py-2 whitespace-no-wrap uppercase text-white" href="/">
          Anita
        </a>
      </div>

      <button className="mobile-menu-button p-4 focus:outline-none focus:bg-gray-700">
        <svg className="h-5 w-5" xmlns="http://www.w3.org/2000/svg" fill="none" viewBox="0 0 24 24" stroke="currentColor">
          <path strokeLinecap="round" strokeLinejoin="round" strokeWidth="2" d="M4 6h16M4 12h16M4 18h16" />
        </svg>
      </button>
    </div>
    <div className="relative min-h-screen md:flex">


      <div className="sidebar bg-gray-200 text-prussian-blue-500 w-64 space-y-6 py-7 px-2 absolute inset-y-0 left-0 transform -translate-x-full md:relative md:translate-x-0 transition duration-200 ease-in-out">
        <nav>
          <a href="https://anita-app.com" className="block py-2.5 px-4 rounded transition duration-200 hover:bg-prussian-blue-600 hover:text-white">
            Menu item 1
          </a>
          <a href="https://anita-app.com" className="block py-2.5 px-4 rounded transition duration-200 hover:bg-prussian-blue-600 hover:text-white">
            Menu item 2
          </a>
          <a href="https://anita-app.com" className="block py-2.5 px-4 rounded transition duration-200 hover:bg-prussian-blue-600 hover:text-white">
            Menu item 3
          </a>
          <a href="https://anita-app.com" className="block py-2.5 px-4 rounded transition duration-200 hover:bg-prussian-blue-600 hover:text-white">
            Menu item 4
          </a>
        </nav>
      </div>

      <div className="flex-1 p-10">
        Content
      </div>

    </div>
  </React.StrictMode>,
  document.getElementById('root')
);
Lets' test if TailwindCSS works and how our initial layout works:
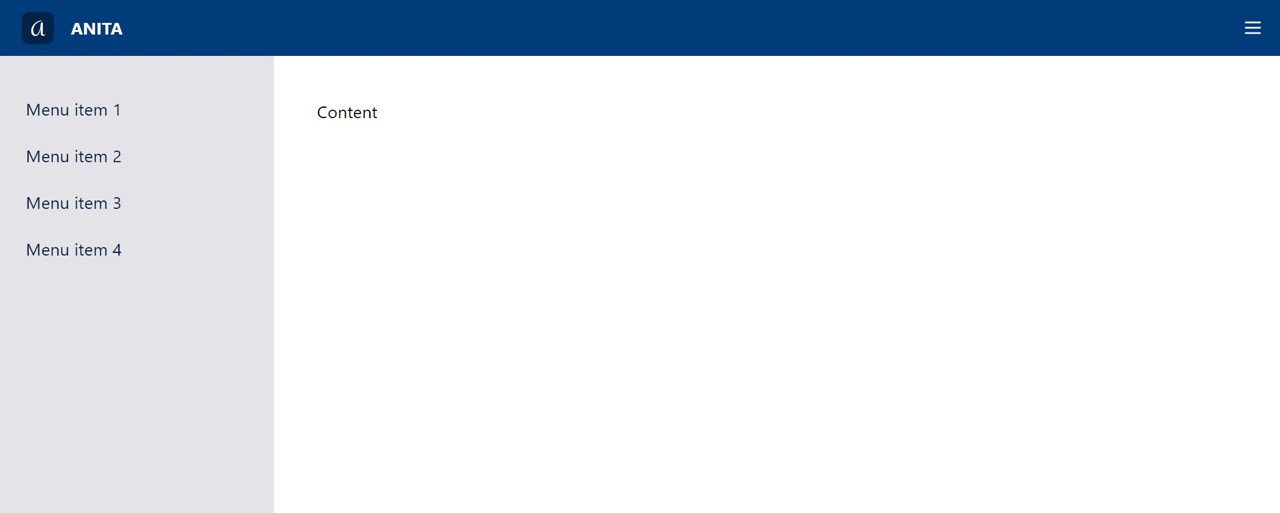
Good enough for now. Let's add some components to improve the layout.
We can divide the layout in three sections:
HeaderSidebarContent
Each of these is a React component imported into a container component called AdminLayout:
export const AdminLayout = () => (
  <div>
    <Header />

    <div className="relative admin-container md:flex">

      <Sidebar>
        <nav>
          <a href="https://anita-app.com" className="block py-2.5 px-4 rounded transition duration-200 hover:bg-prussian-blue-600 hover:text-white">
            Menu item 1
          </a>
          <a href="https://anita-app.com" className="block py-2.5 px-4 rounded transition duration-200 hover:bg-prussian-blue-600 hover:text-white">
            Menu item 2
          </a>
          <a href="https://anita-app.com" className="block py-2.5 px-4 rounded transition duration-200 hover:bg-prussian-blue-600 hover:text-white">
            Menu item 3
          </a>
          <a href="https://anita-app.com" className="block py-2.5 px-4 rounded transition duration-200 hover:bg-prussian-blue-600 hover:text-white">
            Menu item 4
          </a>
        </nav>
      </Sidebar>

      <Content>
        Hello world!<br />
      </Content>

    </div>
  </div>
);
For now, we keep the placeholder text, we will add the actual content later. We will also take care of implementing the open/close functionality for the sidebar later. First we take care of state management.
Porting state management from NgRx to Redux
In the Angular version of Anita we used NgRx, which «provides reactive state management for Angular apps inspired by Redux». As a matter of fact I decided to use NgRx precisely because it is very similar to Redux.
This is very convenient when porting Anita from Angular to React. As we move the code to React we can easily change the calls to the store of NgRx to the one of Redux, and everything will "just work". Normally this wouldn't be easily achievable because NgRx in Angular is loaded as a singleton Service. Singleton Services must be initialized by Angular and therefore their instances are only available inside Angular elements, such as Services and Components.
Thanks to a dirty trick I've been using for years, we can get around this problem. We can initialize the store of NgRx in a custom Service, and pass a reference to the initialized store to a constant that can be imported anywhere in the Angular app.
Angular Services must be initialized in classes with the @Injectable decorator, like so:
export const stateData = {
  ngRxStore: undefined
};

@Injectable({
  providedIn: 'root'
})
export class StateDataService {

  constructor(
    private store: Store<ReducerTypes>
  ) {
    this.initRedux();
  }

  // This is the "dirty" trick
  public initRedux(): void {
    stateData.ngRxStore = this.store;
  }

}
There are two things to note here:
private store: Store<ReducerTypes>initalizesNgRxaccording to the logic governing Angular singleton ServicesstateDatais an Object on which we set the initialized store orNgRx.
In JavaScript using = to assign an Object to another variable does not create a new Object. The = operator assigns to the variable a reference to the Object already in memory. This is why we use stateData.ngRxStore = this.store. We assign the store to stateData.ngRxStore. And because that is a mere reference to the original Object, accessing the properties of stateData.ngRxStore, such as dispatch, actually means accessing the Singleton Service of NgRx initialized by Angular.
Now we can import stateData in any file and use it to access the store without having to initialize it. We can access the store from anywhere in the app without the need to Inject the NgRx Store in the constructor. Doing so we can keep most of the code as vanilla TypeScript/JavaScript and not as Angular Services. This is way most of the code of the Angular version of Anita was in the libs folder, and not in the ng-services one.
This trick has proven to be quite useful in the past, and also in this case it is very convenient as we can transfer all non-angular code to React. All we need to do in the React app is to import the Redux store and replace stateData.ngRxStore with store. For example, in the CurrentProjectSetter class in src/app/libs/project-helpers/project-handlers we can now use store.dispatch instead of stateData.ngRxStore.dispatch. The rest of the code remains the same.
To do so, however, we must first initialize Redux in the React app. Let's start by adding redux and react-redux to the React project:
yarn add react-redux redux
And the types:
yarn add @types/react-redux --dev
Converting NgRx reducers to Redux reducers is quite straightforward. Given the following NgRx reducer:
const projectState: SystemData = undefined;

const _projectReducer = createReducer(projectState,
  on(REDUCER_ACTIONS.setCurrentProject, (state, data) => {
    return data.payload;
  })
);

export function projectReducer(state: SystemData, action: typeof REDUCER_ACTIONS.setCurrentProject): any {
  return _projectReducer(state, action);
}
In React, we have the following:
const projectState: SystemData = undefined;

export const projectReducer = (state: SystemData = projectState, action: Action<REDUX_ACTIONS>): SystemData => {
  switch (action.type) {
    case REDUX_ACTIONS.setCurrentProject:
      return action.payload
    default:
      return state;
  }
}
After porting all the reducers, we can create our react-redux store:
const REDUCERS = {
  project: projectReducer,
  projects: projectsReducer,
  sectionsForChildOfSelector: sectionsForChildOfSelectorReducer
};

const combinedReducers = combineReducers(REDUCERS)

export const store = createStore(combinedReducers);
Now, after providing the store as described in the docs, we can reference the exported const store in our React app.
Routing
In Angular, we use @angular/router to handle routing:
export const routes: Routes = [

  { path: 'private', redirectTo: 'private/projects/list', pathMatch: 'full' },
  { path: 'private', children:
      [
          {
            path: '', component: AdminComponent, children: [

              { path: 'projects', redirectTo: 'projects/list', pathMatch: 'full' },
              { path: 'projects', children: [
                  { path: 'list', component: ProjectsListComponent, canActivate: [ProjectsGuardService] },
                  ...
                ]
              },
              { path: 'project', redirectTo: 'projects/list', pathMatch: 'full' },
              { path: 'project', canActivate: [ProjectGuardService], children: [
                  { path: '', redirectTo: 'projects/list', pathMatch: 'full' },
                  { path: `:${URL_PARAMS.projectId}`, redirectTo: ':projectId/info', pathMatch: 'full' },
                  { path: `:${URL_PARAMS.projectId}/info`, component: ProjectInfoComponent },
                  ...
                ]
              }
            ]
          }
      ]
  },

  { path: '', redirectTo: 'private/projects/list', pathMatch: 'full' },

  { path: '**', redirectTo: 'private/projects/list', pathMatch: 'full' }

];
In React, we use react-router to handle routing. React Router is by far the most popular routing library at this moment, and we don't want to be exotic with our router choice.
First, we need to install react-router.
yarn add react-router-dom
Since Anita is hosted on GitHub Pages, we need to use HashRouter instead of BrowserRouter. In this way the routes of the app are prefixed with the # symbol. To know more about this, check out my previous post on handling URLs of PWAs hosted on GitHub Pages, and the React Router docs.
Since all views are rendered in the same place, the content area of the AdminLayout component is the place where we render the router.
To keep things readable, all routes are defined in a separate React component AnitaRoutes.
import { HashRouter as Router } from 'react-router-dom';

export const AdminLayout = () => (
  <Router>
    <Header />
    <div className="relative admin-container flex">
      <Sidebar>
        <SidebarMenu />
      </Sidebar>
      <Content>
        <AnitaRoutes />
      </Content>
    </div>
  </Router>
);
In AnitaRoutes we define all the routes:
import { Navigate, Route, Routes } from 'react-router-dom';

export const AnitaRoutes = () => (
  <Routes>
    <Route path={ANITA_URLS.projectsList} element={<ProjectsList />} />
    <Route path={ANITA_URLS.projectAdd} element={<AddEditProject />} />
    <Route path={ANITA_URLS.projectEdit} element={<AddEditProject />} />
    <Route path={ANITA_URLS.projectsNone} element={<ProjectsNone />} />
    <Route path={ANITA_URLS.projectDetails} element={<ProjectDetails />} />
    <Route path={ANITA_URLS.projectSectionElesList} element={<SectionElementsList />} />
    <Route path={ANITA_URLS.projectSectionEleDetails} element={<SectionElementDetails />} />
    <Route path={ANITA_URLS.projectSectionAddEle} element={<AddEditSectionElement />} />
    <Route path={ANITA_URLS.projectSectionEditEle} element={<AddEditSectionElement />} />
    <Route path="*" element={<Navigate to={ANITA_URLS.projectsList} />}
    />
  </Routes>
)
Notice how all routes are defined in the ANITA_URLS constant. This is because we want to keep the code as clean as possible, and we want to keep the routes as simple as possible.
export const ANITA_URLS = {
// PROJECTS
projectsNone: '/projects/none',
projectsList: '/projects/list',
projectAdd: `/projects/${EDITOR_MODE.add}`,
projectEdit: `/projects/${EDITOR_MODE.edit}/:${URL_PARAMS.projectId}`,
// PROJECT
projectDetails: `/project/:${URL_PARAMS.projectId}/info`,
projectSectionElesList: `/project/:${URL_PARAMS.projectId}/list/:${URL_PARAMS.sectionId}`,
projectSectionAddEle: `/project/:${URL_PARAMS.projectId}/:${URL_PARAMS.sectionId}/${EDITOR_MODE.add}`,
projectSectionEditEle: `/project/:${URL_PARAMS.projectId}/:${URL_PARAMS.sectionId}/${EDITOR_MODE.edit}/:${URL_PARAMS.elementId}`,
projectSectionEleDetails: `/project/:${URL_PARAMS.projectId}/:${URL_PARAMS.sectionId}/details/:${URL_PARAMS.elementId}`,
}
As you can see, some portions of the routes are defined by other constants, URL_PARAMS and EDITOR_MODE. In this way we avoid typos, and we ensure that routes are consistent throughout the app.
These two constants are pretty simple:
export const URL_PARAMS = {
  projectId: 'projectId',
  sectionId: 'sectionId',
  elementId: 'elementId',
  parentId = 'parentId'
}

export const EDITOR_MODE = {
  add: 'add',
  edit: 'edit',
}
So, for example, the route projectSectionEditEle:
/project/:${URL_PARAMS.projectId}/:${URL_PARAMS.sectionId}/${EDITOR_MODE.edit}/:${URL_PARAMS.elementId}
translates to:
/project/:projectId/:sectionId/edit/:elementId
Now we only need a way to generate the links to the routes. We can do that with a function that fills all params expected by a route. Given a URL, and an array of params and values, the function should automatically fill all params needed to properly generate the final URL:
export function urlParamFiller(url: string, paramsToFill: Array<{ name: URL_PARAMS; value: string }>): string {

  let result = url;

  paramsToFill.forEach(params => {
    result = result.replace(new RegExp(`:${params.name}`, 'g'), params.value) }
  );

  return result;

}
We don't need to worry about the order of the params, because the urlParamFiller function will replace all occurrences of the params in the route.
This function is used to generate the links to the routes, for example to generate the link to the details' page of a project:
<Link
  to={urlParamFiller(ANITA_URLS.projectDetails, [{ name: URL_PARAMS.projectId, value: project.id }])}
  className="px-4 py-3 text-white inline-flex items-center leading-none text-sm bg-prussian-blue-400 hover:bg-prussian-blue-500 rounded"
  >
  <i className="bi-info-circle mr-2"></i>Project details
</Link>
This is a great example of one of the many ways in which React is much easier to use compared to Angular. Our routes are mere strings concatenated with constants that we use to generate the links. To avoid human mistakes, we use the urlParamFiller function to fill the route with its expected params. We don't need to specify a hierarchy of routes, although we could if we wanted with nested routes. We can simply use concatenated string, delegate to urlParamFiller the task of building our full URLs, and we will be able to navigate wherever we need to.
Building the UI
Comparing how we build the UI in Angular and React for Anita unfortunately is not so interesting as we use very different UI libraries.
As I have mentioned above, in Angular, we used Nebular, a UI library based on Bootstrap 4, that comes equipped with a ton of pre-made UI components. In React, we use TailwindCSS, which provides the building blocks to create beautiful UI components, but does not ship with any pre-made components. So, we need to build our own.
In short, we need to rebuild from scratch the whole UI of Anita.
One notable thing of the process is that in doing so we did not need to extrapolate much code from Angular components. A very important best practice that I always try to follow is to keep the UI and the code as separate as possible. When creating a new UI component, it is important to keep any logic of the app in the app's code, and not in the UI component. In Anita all such code is in the src/app/libs folder, both in the Angular and in the React version. In the components we import the libs classes and functions we need to make the app work.
When comparing the Angular and React versions of Anita, we can also note that the Angular version is much more complex, because it has a lot more boilerplate.
Let's look at one of the simplest components of the Angular app, the AddBtnComponent, which is composed of three files:
add-btn.component.ts: the component itselfadd-btn.component.html: the HTML template of the componentadd-btn.component.scss: the styles of the component (omitted)
add-btn.component.ts:
import ...

@Component({
  selector: 'app-add-btn',
  templateUrl: './add-btn.component.html',
  styleUrls: ['./add-btn.component.scss']
})
export class AddBtnComponent {

  @Input()
  public url: string;

  @Input()
  public icon = 'plus-outline';

  @Input()
  public element: SectionElement;

  constructor(
    private router: Router
  ) { }

  public navigate(): void {
    this.router.navigateByUrl(this.url, {
      state: { element: this.element }
    });

  }

}
add-btn.component.html:
<button *ngIf="url" nbButton shape="round" status="primary" size="giant" class="position-absolute shadow" (click)="navigate()">
  <nb-icon [icon]="icon"></nb-icon> <!-- Nebular icon element -->
</button>
The equivalent in React is a single file of 6 lines (add-edit-element-button.component.tsx):
export const AddEditElementButton = ({ icon, url }) => (
    <Link to={url} className="absolute bottom-5 right-7 md:bottom-7 md:right-10 bg-prussian-blue-400 text-white text-xl shadow-xl rounded-3xl h-14 w-14 flex items-center justify-center">
      <i className={icon}></i>
    </Link>
  )
Since the introduction of Hooks in React 16.8, the boilerplate is close to zero.
I'll leave to the reader to decide what they prefer. All I can say is that the React version is quicker to write, and easier to maintain. Which, for a project like Anita, is a very good thing.
Final result
Porting Anita to React has been a very fun project, that has been a great learning experience. Comparing how the same functionalities can be implemented with the two different frameworks gives a lot of perspective. I strongly believe that the result is a good one, and I hope that it will be a great help for other developers.
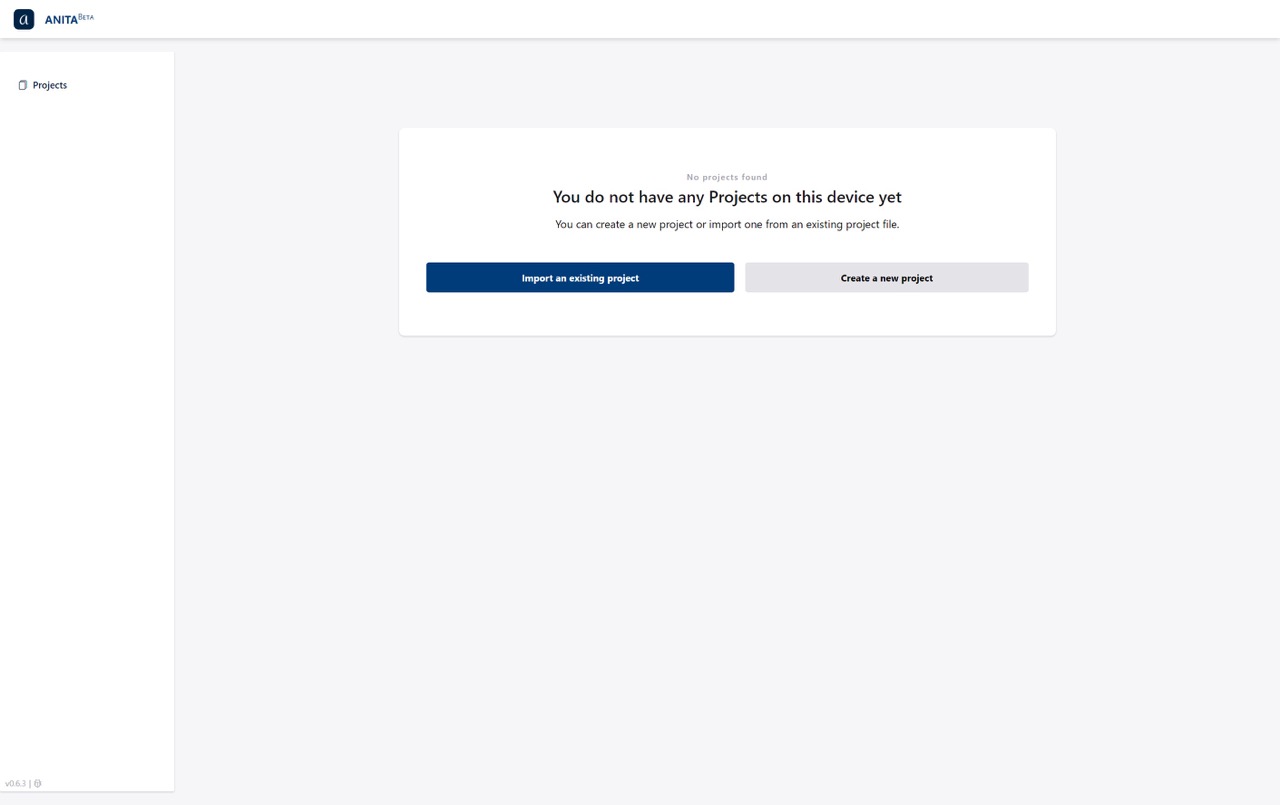
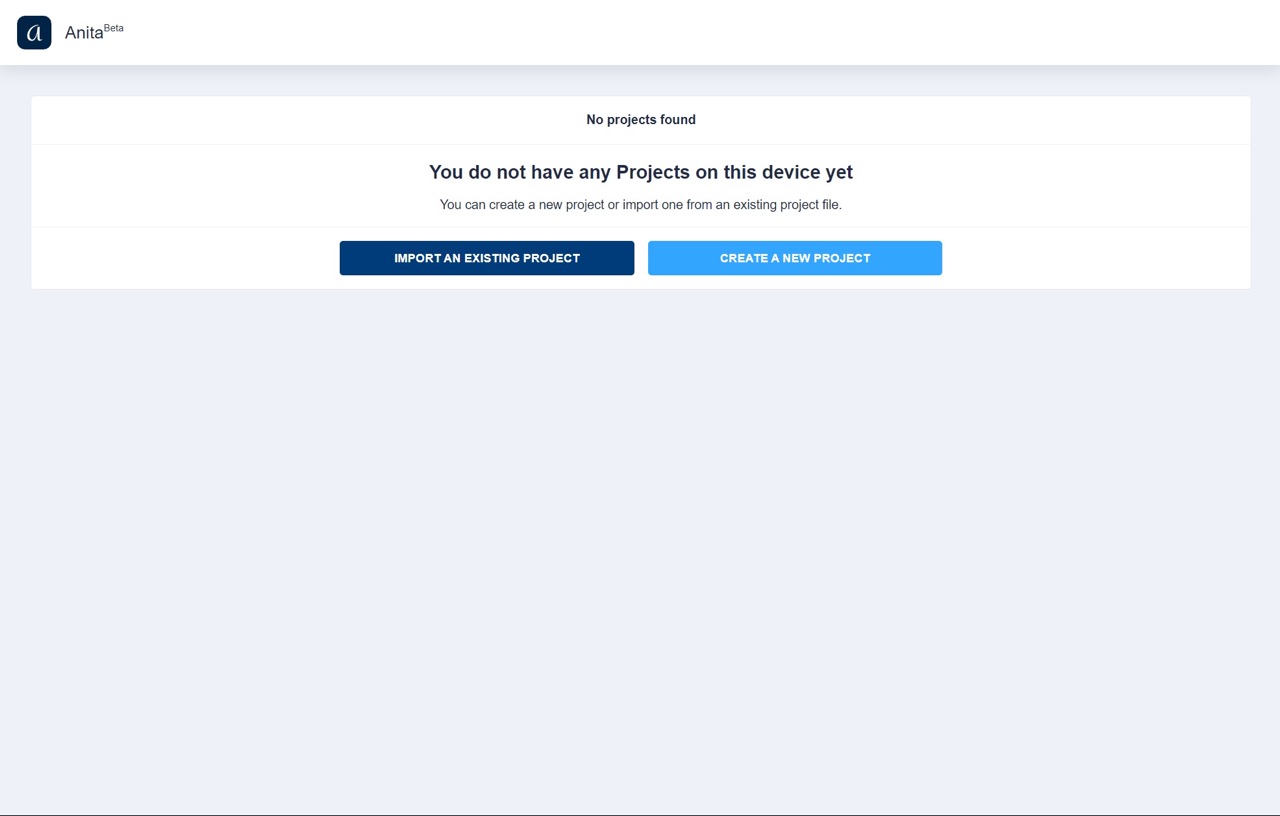
And now some screenshots of the final project, which you can also try live by visiting the actual Anita React app:
- The initial page, without any project:
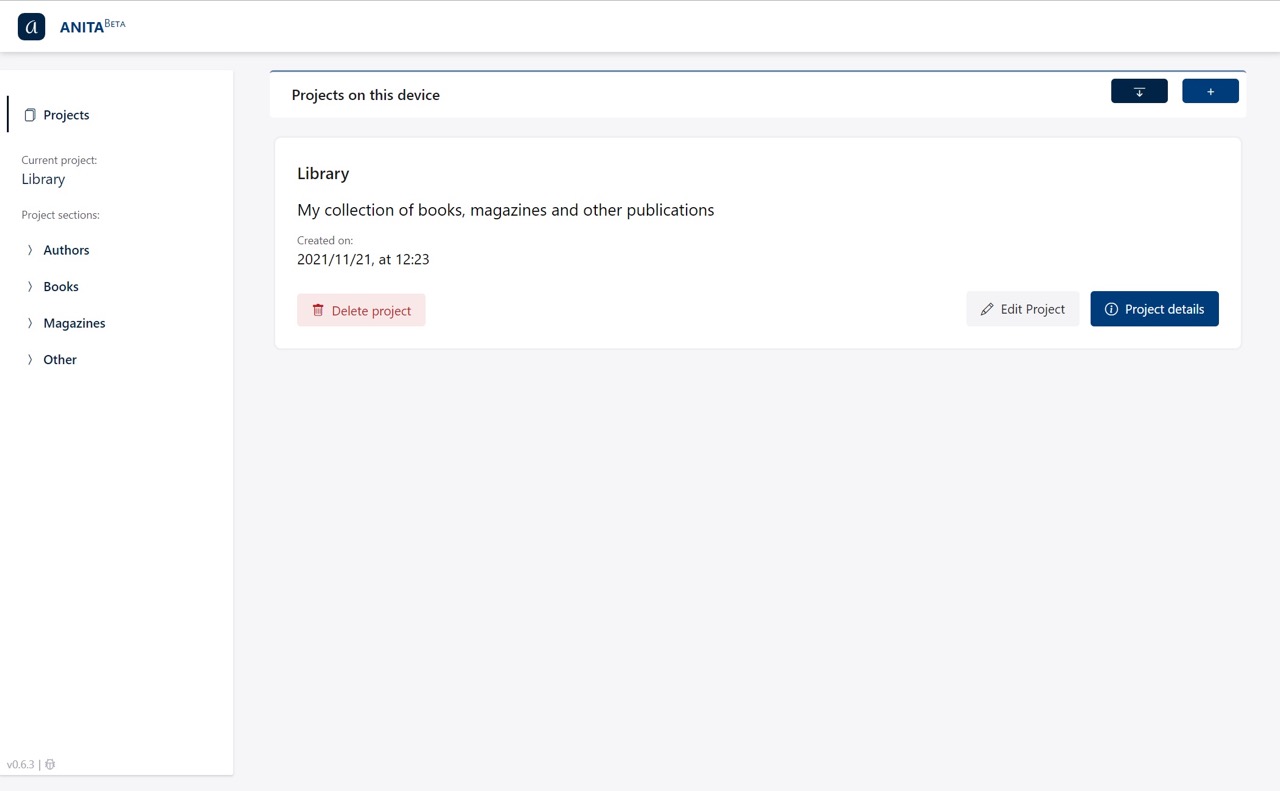
- A view of an example project:
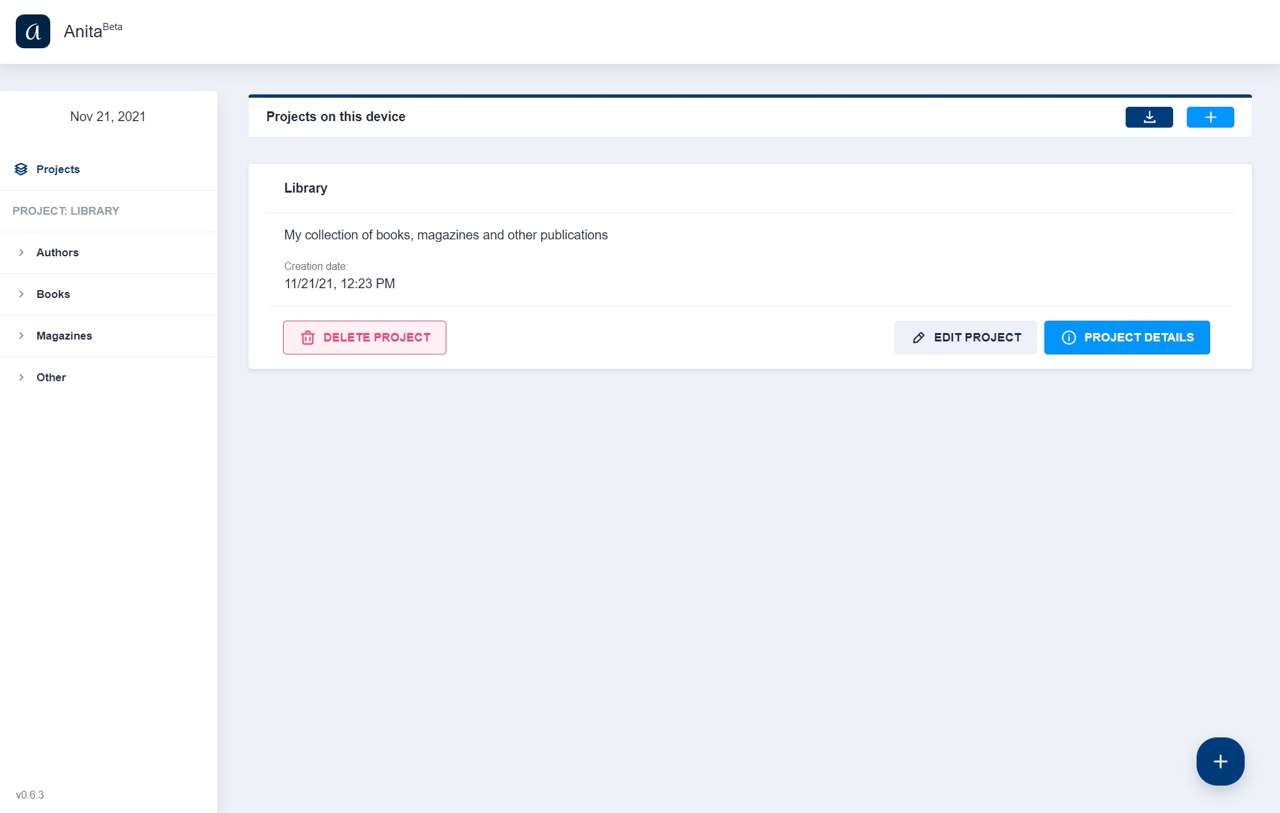
For comparison, the same views in the Angular version.
- The initial page, without any project:
- A view of an example project: